Tournament Prep: The Lake Marshall Open
This will be the first A-Tier of the season, and it will be on the most beautiful, ass-kicking set of courses that I’ve ever been humbled by!
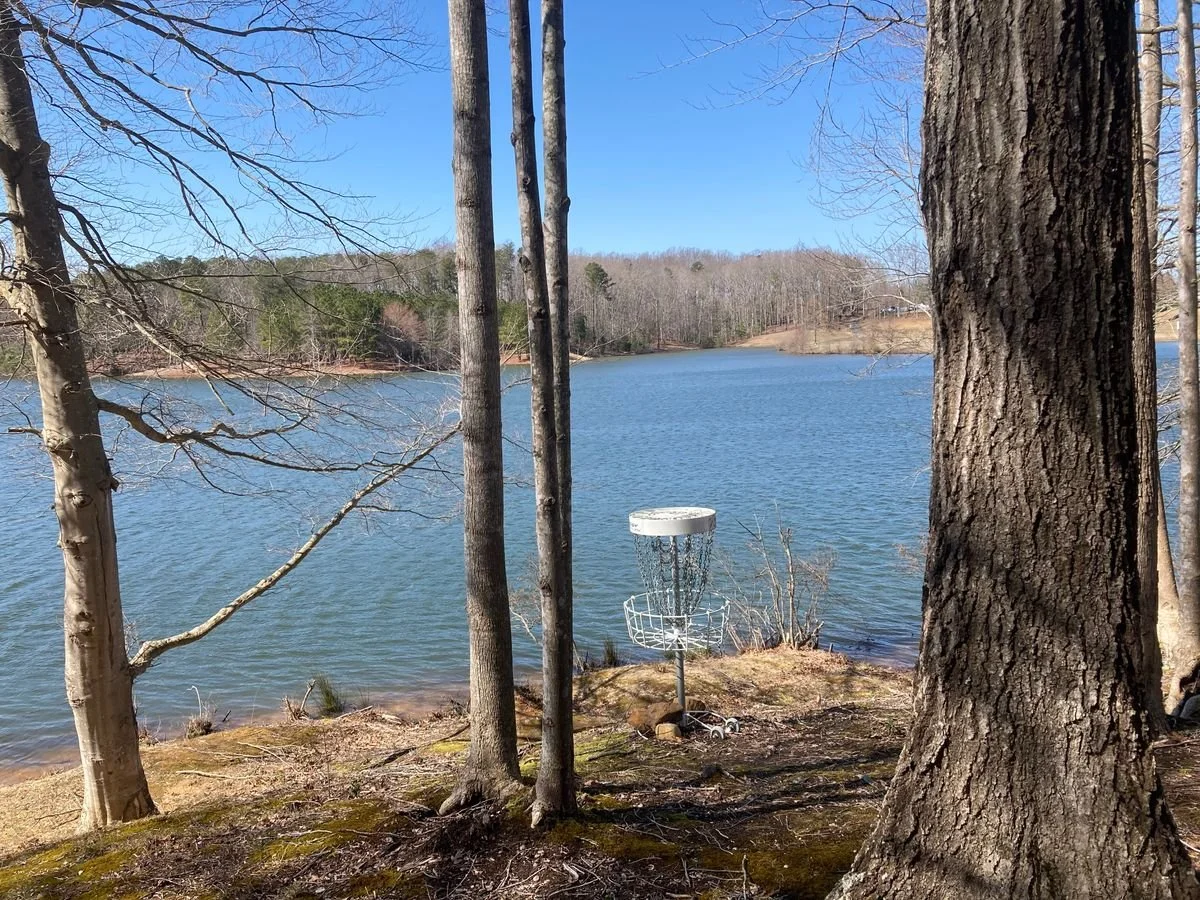
The two courses that will be used for this tournament are as different from either other as they could possibly be. The shorter of the two courses, the “Lair” course, is heavily wooded and technical; requiring extreme accuracy, height and distance control, and scrambling ability. The “Lions” course, on the other hand, is a 10,000+ foot beast (depending on the adjustments for division) that demands both power and finesse, combined with a generous helping of angle control and “touch” around the greens.
The two times that I have attempted to conquer these courses left me physically and mentally exhausted — and not just because of the distance of the “Lions” or the tight lines of the “Lair.” These courses require you to be thinking one or more shots ahead at all times, while still focusing on executing the shot at hand.
All this while being surrounded by what feels like a nature preserve, complete with a huge lake, soaring bald eagles, and about 16 million squirrels!
I will be playing two rounds on the “Lair” course and one round on the “Lions” course; and due to my division, both courses will be shorted/modified for playability (and so that they don’t kill the old guys!) As of the date of writing, we will be playing the short tees on the “Lair” course (affecting 7 holes) and the “Yellow” layout on the “Lions” course, including the short tees on holes 7 and 12, and the short basket on hole 8.
Lair Course
This course is #4 of my top 10 courses that I’ve played. That being said, I’ve only had the pleasure of playing this course a half dozen times. Even so, most of these holes have been burned into my memory, and that will help with the tournament preparation. Many of the holes have one or more elevation changes incorporated into the fairway. Several holes have water as a part of the layout; namely holes 1, 10, and 15 having water around the green, holes 2, 14, and 15 having at least a partial water carry, and hole 11 having water all along the right side of the fairway. There are holes with extremely tight fairways (hole 4, for example), tricky doglegs (hole 18 comes to mind), and risk/reward choices that can mean the difference between a birdie and a REALLY big number (hole 16’s 1st landing zone).
Lions Course
On the other end of the spectrum is the “Lions” course, with the MP60-designated layout coming in at a measly 9,647 feet (as opposed to the “Big Boy” blue layout at 11,613 feet!) This course forces the player to ride the very edge of the distance vs. control balance. The modified “Yellow” layout only has three par 5’s (Hole 1 @ 822 feet, Hole 6 @ 761 feet, and Hole 18 @ 820 feet) ,but the distance of the 5 par 3’s averages around 303 feet, and the average for the other 10 holes (all par 4) jumps to 531+ feet. And these fairways are NOT just wide open, “grip it and rip it” fairways. There are low ceilings, drastic upslopes, water carries, and other obstacles to deal with.
Course Stats
Here are the stats from UDisc for each hole:
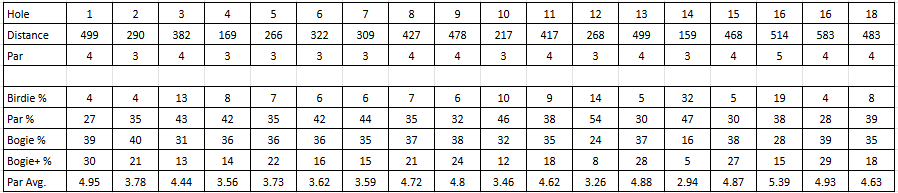
Lair Stats
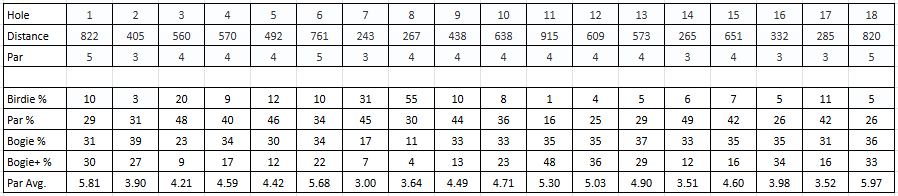
Lions Stats
Note: I’ve added UDisc’s score percentages and used then to calculate my own score average for each hole.
Course Data
My current course data is drawn from 9 years of tournament data from the PDGA website. It averages the round ratings across all of the sanctioned tournaments in that timeframe and for this layout, and dumps out statistics for the course. This is what it looks like:

Lair Stats

Lions Stats
Given that I would like to consistently hit a 930+ rating on my rounds, I would need to throw a 2-over on the Lair course and 6-over on the Lions course to hit that mark.
So those are my goals: +2 and +6.
My Data
As of today, my personal data for the Lake Marshall courses consists of 6 recorded and rated rounds (4 on the “Lair” course and 2 on the “Lions” course). This is the summary data:

Lair Data

Lions Data
Explaination:
Current Average My average for that hole across all of my recorded rounds
Optimistic The above average rounded down
Pessimistic The above average rounded up
Rounded The above average rounded numerically (.5 rounds up)
Reasonable My best guess at what I *should* score on this hole
Tumbling Down the Rabbit Hole
I look at each hole individually and gauge my score probability based on hole distance and elevation change, and my score on that hole from my previous rounds. I have played more than a few rounds on these courses, so I'll also factor in what I know about how I throw each hole.
First, I’ll work through the Lair course.
Hole 1 - 499 ft - Par 4
The drive is key here. You’re throwing over a ravine to a narrow fairway which slopes right-to-left and has dense rough on both sides. For your second shot, the green is to the left side of the fairway, so your drive’s initial landing zone should be on the right side of the fairway, but not in the rough if you can manage it. The shot to the green is touchy, with the water to the left and behind the basket, so if there is any doubt, just lay up well short and take the par.
Expected Score: 4 Hole 2 - 290 ft - Par 3
The first water carry of the round — which is not a true “over-the-water” flight unless you intentionally go out over the water with a RHFH, which is your play. The basket is reachable — barely — but there is a guardian tree short and left of the basket which will mess with that approach angle. Most likely, you’ll end up well short of the green with (maybe) a long birdie look. Just don’t overturn your drive and you’ll be fine.
Expected Score: 3 Hole 3 - 382 ft - Par 4
The first order of business on this dogleg-left fairway is the get around the corner without putting yourself in a position where you can’t reach the green. Accomplishing this, a birdie is well within the realm of possibility. The second half of the fairway is pretty straightforward, so focus on the initial drive. I’m guessing (from memory) that forehanding the Bear will put you in position, but play the disc selection and shot choice by ear.
Expected Score: 4Hole 4 - 169 ft - Par 3
This is one of the tightest fairways you’ve ever played. Of the few times that you’ve thrown this drive, you’ve only cleared the initial gap cleanly once. The correct shot here is a forehand flex with the flippier of your two Anvils. If you clear the initial gap AND have your release angle correct, you should find yourself either on the tiny green before the drop-off behind the basket, or in the right rough short of the basket with a possible look for birdie. The worst thing to do is hit early. The second worst thing to do is to miss your approach long and have to come back up the hill. With care, you should come away with a good score.
Expected Score: 3Hole 5 - 266 ft - Par 3
This is a VERY tricky fairway. Heavily wooded, creek/ravine all down the left side, and the “green” (all 9 square feet of it!) is perched on the top of a mound surrounded on 3 sides by a 20 foot deep ravine. Reaching the green is relatively easy; “sticking” the green is not. I’ve seen multiple roll-aways create some pretty big numbers here, and there’s not really any way to plan out this hole. Use a forehand drive to try to end up to the right of the fairway where the ravine is the shallowest, Then play to the basket and hope you don’t roll down the hill.
Expected Score: 4Hole 6 - 322 ft - Par 3
This basket is out of my drivable range, especially with the slight upslope near the basket. It’s a gentle right turn, so a long forehand flex is probably your best choice. Be careful of pushing the left side of the fairway; you had early tree hits on that side in the past.
Expected Score: 3Hole 7 - 309 ft - Par 3
This is a fun, downhill drive, and it plays much shorter than 309. A backhand flex with your Bard or your stable Warship should give you a look at birdie if your execution is on point. There are lots of trees bordering the fairway, so short and safe is much better than pushing the distance and hitting early. Catch your breath here, because the next several holes are TOUGH!
Expected Score: 3Hole 8 - 427 ft - Par 4
“Over the river and through the woods…!” The teepad has been a bit sketchy in the past, and you need as much “oomph” as you can get for this initial shot. You need to get across the ravine and as far up the far slope as you can get, without ending up in the rough on either side. Once you get over, your next shot will depend on where you land your initial drive. You will still be going uphill, so play for more distance than you think you need. This one is touchy, so be careful.
Expected Score: 4Hole 9 - 478 ft - Par 4
Play the drive on this hole onto the landing area and no further. Trying for more distance will only cause you to have an obstructed second shot from one of the many rough spots around the landing zone. Hitting the actual landing area will let you throw a long, flat backhand with an overstable mid/fairway that should get you close. Just how close you land will determine whether you have a birdie look, or an up-and-down par look.
Expected Score: 4Hole 10 - 217 ft - Par 3
This is the touch-shot to end all touch-shots! Extremely downhill, with a very narrow, curving fairway on either side of the center trees. The lake is just behind the basket, so watch the distance control. If you pure the fairway, you have a great chance at a birdie.
Expected Score: 3Hole 11 - 417 ft - Par 4
The difficult part of this hole is the second shot, but you can make it easier on yourself if you keep your drive away from the edges of the fairway. The second shot needs to access the green through a line of guardian trees, and staying in the center of the fairway will give you some possibilities to actually be successful with the next shot. The water does come into play here, but more on the green than the fairway.
Expected Score: 4Hole 12 - 268 ft - Par 3
Another touchy drive — this one downhill to a hard left turn and then back up the hill to the basket. This means that the canopy on the corner has the chance to knock your drive out of the air if you are not playing smart and executing well. This one is barely reachable, so don’t sweat a par here.
Expected Score: 3Hole 13 - 499 ft - Par 4
Throw a forehand drive from the tee here to have your disc moving right at the end of it’s flight, and make sure that you give the drive enough straight-line distance to make the corner. The green here is the real challenge, as it is on a mound with a severe drop to the right. You’ve been down that hill before, so keep your approach under control and don’t go for too much at once.
Expected Score: 4Hole 14 - 159 ft - Par 3
Don’t let the water carry get into your head. Play the drive safe and long, make sure that you make the far side, then worry about your putt.
Expected Score: 3Hole 15 - 468 ft - Par 4
Another water carry, but this time you need to hyzer out over the water so that you can stay clear of the left side trees near the first landing zone. Then if you have an open lie, you should have a decent shot at getting to the well-protected green with your next shot. Again, there is water long and right of the green, so discretion is better than a big number.
Expected Score: 4Hole 16 - 514 ft - Par 4
The temptation here will be to try to make the top of the hill on the other side of the ravine from the teepad. If you are feeling particularly feisty, then go for it, but the better choice here is to play a shorter forehand shot and stay on this side of the ravine and as high on the hill as possible. Then you can throw across with distance and set yourself up for an easier approach than you would have if you landed at the bottom on the hill. Par is a good score here.
Expected Score: 5Hole 17 - 583 ft - Par 4
This fairway is both longer and narrower than you think. Keep your drive lower than normal to avoid the artificial OB left and the natural OB right. This fairway is two long-straight drives followed by an approach to a green that slopes away behind the basket. Accuracy gets the good score here.
Expected Score: 4Hole 18 - 483 ft - Par 3
History says that you will NOT make the corner on this fairway with your forehand, leaving you obstructed when trying to cross the ditch. The drive is downhill, however, so a backhand that goes too high will find the OB on the left. As long as the forehand shots haven’t been too short or scattered today, it’s probably the better option. Just keep the drive a little extra far left, so that if you don’t quite make the corner, you still have a way to get across to the green.
Expected Score: 4
Expected score: +1 (66)
Avg. Historical Rating: 942
Since yourgoal is +2, you don’t have much wiggle room for mistakes. You’re going to need to be focused and pay attention to what you are doing — even more than normal!
Now for the “beast-ly” Lions course:
Hole 1 - 822 ft - Par 5
The landing zones are key! Cross the first ditch to make the first landing zone; cross the second ditch to make the second landing zone. These are almost full power shots — just try your best to end up in the clear; not in the ditches and not in the trees. If you can make the second zone on your second shot and not be OB right or in the trees left, then you can approach the green with the possibility of birdie still in the works. There is also OB surrounding the green, so approaching long is dangerous.
Expected Score: 5 Hole 2 - 405 ft - Par 3
Downhill. Narrow. Dense rough on both sides. This par 3 is no joke. Big numbers are possible here, so play it safe and stay out of trouble. Use a neutral disc and don’t try to bite off too much. Par is good.
Expected Score: 4 Hole 3 - 560 ft - Par 4
Back up the hill, but this one plays a little easier than the last. A big backhand drive, to get up the hill and move left, then a forehand second shot to get around the dogleg corner and seek out the green. The green has a slope away and left, so long could be a problem.
Expected Score: 3Hole 4 - 570 ft - Par 4
The tree-lined tunnel at the beginning of this fairway will require focus to stay out of trouble. Throw a backhand drive long and straight, and the left finish will help get you lined up for your second shot. Locate the basket before you throw your second shot, because the bushes in the front of the green area can sometimes mess with your targeting. Par is good. Keep on marching!
Expected Score: 4Hole 5 - 492 ft - Par 4
Coming back up the hill, the trees are now in the middle of the drive path instead of the beginning. Don’t fear the trees, just pick a line and trust your shot. This hole isn’t complicated, but it does have teeth. Be careful and you’ll be fine. Par is good.
Expected Score: 4Hole 6 - 761 ft - Par 5
This long, narrow tunnel is perfect for the “midrange march.” Just stay out of the rough, march right down the fairway, and get your disc in the basket. Say it again with me: “Par is good!”
Expected Score: 5Hole 7 - 243 ft - Par 3
“It’s time for the water carry portion of our program!” This is a forehand fairway drive to a peninsula green. Too far right is fine, too far left is wet. Make the correct choice and don’t get cute.
Expected Score: 3Hole 8 - 267 ft - Par 4
Since we are playing to the short basket, we only need to worry about the first water carry. Use the Prince to make sure that you are safely on dry land, THEN worry about the basket. No need to get creative. Par is good.
Expected Score: 3Hole 9 - 438 ft - Par 4
Remember that you HATE this hole, then step up and put your drive on top of the hill. Once you get past that hump (pun intended), play the rest of the holes as a short par 3. Stay right on the initial drive if you can, the fairway is more open on that side.
Expected Score: 4Hole 10 - 638 ft - Par 4
Just remember that you are only able to get TO the corner, not AROUND it. Don’t let your shot drift too far left before the corner, or you’ll pinch yourself off from any decent look at the green. A big hyzer second shot from your intended landing zone will put you near the basket. Just remember the OB on the right.
Expected Score: 4Hole 11 - 915 ft - Par 4
A big downhill drive (try to stay left if you can), then another “full-pull” drive (again trying to stay left) should get to to a place where you can at least see the green. There’s OB right the entire way, so make sure that you are going to clear the corner of the rough when approaching the green. This is where you are going to start getting tired, so adjust if necessary.
Expected Score: 5Hole 12 - 609 ft - Par 4
You’ve missed the corner and gone into the lake both times that you’ve played this hole. Time to play to the left to stay safe, then pitch up to the bailout area before the second water carry. Two correct throws should make this hole at least semi-manageable. Don’t sweat a bogey here, but par is a big possibility.
Expected Score: 4Hole 13 - 573 ft - Par 4
Just get across the water with your tee shot, then worry about the rest of the hole. A forehand second shot is probably the best bet, although a big backhand turnover gives the cleanest landing on the sloped green. You won’t birdie this hole, so just don’t bogey it, either.
Expected Score: 4Hole 14 - 265 ft - Par 3
Get up the hill to the fence with your initial drive. Hitting an early tree will earn you large numbers. Nothing complicated. Par is good.
Expected Score: 3Hole 15 - 651 ft - Par 4
Play your drive to the flat; trying to throw your second from the slope leads to less-than-optimal results. This is a tricky sloped green ,so make sure that you don’t go long.
Expected Score: 4Hole 16 - 332 ft - Par 3
Playing the short basket here, so a nice, long, super straight midrange is just fine for a drive. Hitting early is really the only danger here. so be confident and put it right down the center. Par is good.
Expected Score: 3Hole 17 - 285 ft - Par 3
Tricky, tricky! Down hill shot with low branches on the right and OB to the left, short, and long of the basket. You can birdie this hole, but you can also get a gigantic number. Play away the the gigantic number, please.
Expected Score: 3Hole 18 - 820 ft - Par 5
Yes, you’re exhausted. And you’re probably still thinking about whatever mistakes that you’ve made during the round. Put them both out of your mind and play this last water carry drive to the left to make sure that you stay dry. this is a long, uphill hole, so it’s going to take multiple shots to get to the basket. If you can stay left and dry on the drive, get to the bottom of the hill with your second, and most of the way up the hill on your third, then you can finish with a par and feel good about the round!
Expected Score: 5
Expected score: Even (70)
Avg. Historical Rating: 970
WOW! Wouldn’t that be nice!! Given that my target is +6, I have 6 strokes to play with, which is a nice buffer. The word of the day needs to be “smart.” No over-aggression, no petulant pouting, no “I-can-make-up-for-that-last-mistake”. Just smart, consistent, confident play. You play in a professional division — time to start acting like a professional.
So just keep the plan in mind, leave the frustration in the car, and play with confidence.
And joy. Always with joy.