Tournament Prep: The Coyote Howler
Just as a warning, this is going to be a long post, since the “Coyote Howler” is a two-round tournament played on two different layouts on the same course. That means double the data, double the analysis, and double the write-ups.
The long layout at Coyote Hills has always been a challenge for me. Most of the holes are at the limit (or beyond) of my driving distance, so opportunities to score are extremely limited. The only holes that I can (reasonably) reach for scoring opportunities are holes 4, 7, and 17 — and there are dangers on these holes as well. So the play for the long layout is to change the playing style to break up the holes in an intelligent way to minimize the mistakes and lost strokes.
The shorter layout is one of those courses where it seems like I should be able to reach quite a few holes, but I never do (or, at least, not consistently). Holes like 1, 5, 8, 11, 12, 14, and 15 seem like they should be birdie-able, but really are teasingly out-of-reach.. My scorable holes on this layout are limited to 3, 4, 7, and 17. So, again, the focus is going to be on “not screwing up.”
Just for comparison, my best scores on these layouts (to date) have been a +5 (68) on the long course and a -5 (53) on the short course.
(Of course, I’ve also played to a +18 (81) on the long layout and a +9 (67) on the short one.)
Course Stats
Here are the stats from UDisc for each hole:
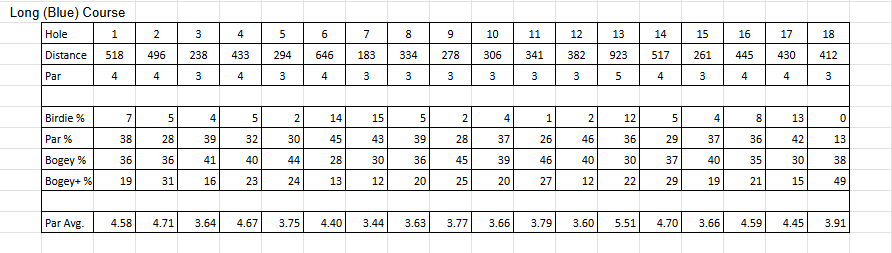
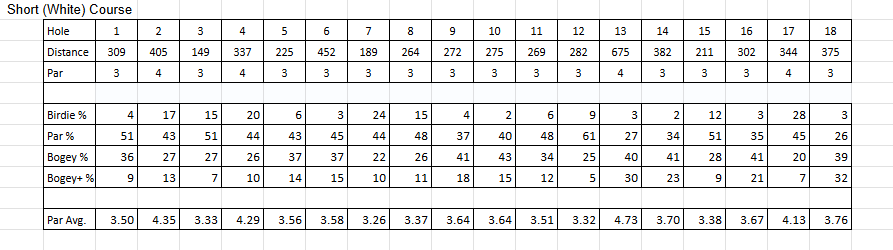
Note: I’ve added UDisc’s score percentages and used then to calculate my own score average for each hole.
Course Data
My current course data is drawn from 9 years of tournament data from the PDGA website. It averages the round ratings across all of the sanctioned tournaments in that timeframe and for this layout, and dumps out statistics for the course. This is what it looks like:


Given that I would like to consistently hit a 930+ rating on my rounds, I would need to throw a 7-over on the Long course and 3-over on the Short course to hit that mark.
So those are my goals: +7 and +3.
My Data
As of today, my personal data for the Coyote Hills courses consists of 21 recorded and rated rounds on the Long course and 13 recorded and rated rounds on the Short course. This is the summary data:


Explaination:
Current Average My average for that hole across all of my recorded rounds
Optimistic The above average rounded down
Pessimistic The above average rounded up
Rounded The above average rounded numerically (.5 rounds up)
Reasonable My best guess at what I *should* score on this hole
Tumbling Down the Rabbit Hole
I look at each hole individually and gauge my score probability based on hole distance and elevation change, and my score on that hole from my previous rounds. I have played more than a few rounds on these courses, so I'll also factor in what I know about how I throw each hole.
First, I’ll work through the Long course.
Hole 1 - 518 ft - Par 4
This long, uphill fairway has an OB peninsula right in the middle, but it is beyond your reach unless you fade way to the right. A backhand “full-pull” should put you in a good position to attack the green with a long forehand, but be careful of the OB long and right of the green. Bogey is common for you on this hole, so play your approach wider left than you think you need to (to avoid the OB right) and come away with a par.
Expected Score: 4 Hole 2 - 496 ft - Par 4
This is one of Coyote Hills signature holes — the long tunnel! Keeping your disc from clipping a tree in the tunnel is the single most important aspect of this hole. Keep your drive low and slow down the tunnel, then worry about navigating the long left turn to the green. A decent drive — even one that doesn’t clear the mouth of the tunnel — will keep par in play, as long as you don’t need to pitch out of the trees. Three midrange control shots should put you on the green, if you play this hole smart.
Expected Score: 4 Hole 3 - 238 ft - Par 3
You have never driven this green from the tee — you almost always end up short, left, and uphill from the frighteningly difficult green. This time, use an overstable fairway driver and throw your flex shot to the right side of the fairway to avoid the “corner” trees on the left. Imagine your aim point long of the actual basket location, and trust the overstability of the disc to bring it down before the OB behind the basket. Even if you do go OB, you’ll be in a position to save your par from the edge of the green.
Expected Score: 3Hole 4 - 433 ft - Par 4
“Straighter is Better” for the initial shot on this severely uphill drive, since you usually end up pinched on the left corner of this dogleg fairway. Get your initial drive to the right side of the fairway at the top of the hill, then worry about crossing the ravine to the green. A birdie is possible here with two good shots, but there are lots of branches in the low ceiling of the second shot, so don’t turn the slight chance of a birdie into a high-probability bogey by getting greedy. Play smart.
Expected Score: 4Hole 5 - 294 ft - Par 3
Back over the ravine. Stay to the right, as the green is tucked to the left and it’s easy to get pinched and not have a clear line to the pin. You’ll need at least a fairway driver to get enough distance to have an open look. This is a tricky par 3, with lots of ways to get in trouble, so stay clean, grab a par, and move along.
Expected Score: 3Hole 6 - 646 ft - Par 4
Pick your poison on this initial drive; either forehand to the left of the cell tower area and risk both the cell tower fence obstruction and the OB line on the left of the fairway, or backhand to the right of the tower fence, and risk the fence obstruction and the “natural OB” tree line on the right of the fairway. Either way, your drive needs to be positioned such that you have a decent line to the green, with it’s OB left and long of the pin. The worst possible outcome is to be obstructed by (or worse, OB within) the cell tower fence. Worry about dealing with that fact first, then proceed from there. As usually, your second shots have been short on this hole, so a little extra juice on the approach is justified.
Expected Score: 4Hole 7 - 183 ft - Par 3
This is a finesse shot — perfectly straight backhand or high-flexing forehand with a midrange at 75% power. The trick is missing all of the branches and not dropping into any of the OB areas before you get to the green. This is one of the rare birdie opportunities in this layout, so a little aggression is permissible — but if you’re not feeling it, just play it safe and don’t mess it up.
Expected Score: 3Hole 8 - 334 ft - Par 3
Read the distance again. You’re not reaching the pin from the tee. Just keep your drive out of the trees (left and right) and give yourself the best chance to get up and down for the par. Lately, your forehand drive has been getting lucky and cutting through the trees on the right — but counting on luck will jack up your score. Play a backhand drive down the right side and let it fade back into the middle of the fairway. Then do the typical “up-and-down” thing and keep moving forward.
Expected Score: 3Hole 9 - 278 ft - Par 3
A straight, tight fairway to a landing zone with the pin to the right. Lately, your forehand play has been hitting trees and costing you strokes, so a backhand midrange might be a better idea — if that shot is dialed. Use a flippier disc than you think you need, and take a little power off the shot for more control. Don’t let this fairway get in your head — you’ve hit this gap before, you can do it again.
Expected Score: 3Hole 10 - 306 ft - Par 3
Another straight, tight fairway with a narrow gap to hit on the initial drive; only. this time, the pin sits to the left, so a forehand drive that finishes a bit right is desirable. Don’t worry about max distance on the drive, just stay in the fairway and give yourself an approach. Stay present and trust your shots and your discs to do what they should.
Expected Score: 3Hole 11 - 341 ft - Par 3
You love this hole! Play a backhand midrange placement shot to the mouth of the gap, then test your approach precision with an forehand down the tunnel. Even though this is scored as a par 3, a bogey is easy to find if you are not confident and careful. Keep the approach low, however, since an errant kick into the scruff near the green can add multiple strokes to your score.
Expected Score: 3Hole 12 - 382 ft - Par 3
Just stay with right on this drive. The approach shot is where you can better dictate your score. A lie with an open look into the heavily guarded green gives you the best chance to keep your scorecard clean.
Expected Score: 3Hole 13 - 923 ft - Par 5
Just throw it as far as you can, then as far as you can again, then as far as you can again. If you can manage to keep your shots in the fairway all three times, then you might have a chance to get up and down for a par. A bogey is more likely, given your history, the distance, and the uphill slope.
Expected Score: 6Hole 14 - 517 ft - Par 4
One of the two most difficult holes on this layout. The initial tee shot is a very precise backhand turnover or gently fading forehand. Not making the landing zone at the hard left bend in the fairway will cost at least one stroke. Once you make the corner, you just need to contend with 100 trees, the low ceiling on the downslope, and the very small, sloped, and well protected green. Try to keep your initial drive as low as possible to still make the corner, then play what you’re given.
Expected Score: 4Hole 15 - 261 ft - Par 3
Not the most difficult hole, but certainly one of the most frustrating — combining a tight initial gap, a steep upslope, and lots of ugly rough if you miss your shot. You are NOT reaching this green from the tee pad, so disc down and play smart. A par on this hole is a win!
Expected Score: 3Hole 16 - 445 ft - Par 4
The second hole in a row which just seems to frustrate you every time you play it. Your drive won’t make the obvious landing zone at the corner of the left dogleg, so play to stay on the right side of the fairway (NOT in the rough), and perhaps you’ll have a lane to get through the final trees, pass the corner, and down the slope to the green. Getting too aggressive has cost you strokes in the past, so try the “smart” play this time.
Expected Score: 4Hole 17 - 430 ft - Par 4
One of the few holes on the course where a birdie is on the table with a good, long drive that finds the middle of the fairway. Even at the bottom of the hill, if you are in the right place, you can get yourself a look at birdie with a good approach. Don’t over-cook your drive, however — that’s how you end up obstructed or in the rough and cost yourself strokes. Stay smooth and precise, and see what you have to work with on your second shot.
Expected Score: 3Hole 18 - 412 ft - Par 3
This fairway competes with hole 14 for the hardest hole in the layout. A long and EXTREMELY tight fairway to a landing zone which then bends right, then left to a green which slopes away from the tee pad. A forehand wont stay straight long enough to get out of the tunnel, so the best option is to use a straight, low backhand midrange to progress down the tunnel, then work a shaped shot toward the green with whatever you have left. This hole is REALLY a par 4 that identifies as a par 3, so don’t be upset with a bogey here.
Expected Score: 4
Expected score: +3 (66)
Avg. Historical Rating: 960
Since my goal is +7, I have four strokes to play with during this round. I wouldn’t be surprised to lose strokes on holes 14, 15, and 16, since those holes have historically given me fits. (Historic averages: 5.5 on the par 4 14th, 4.0 on the par 3 15th, and 5.1 on the par 4 16th). That would still put me at a +6 , which rates around a 936.
I would be SO ok with that!
The second round will be on the short layout, so let’s take a look a those holes:
Hole 1 - 309 ft - Par 3
With natural OB tree line on the right and the entire fairway sloping in that direction, it’s easy to land your drive too far right and pinch off any good line to the green. There’s OB left and right of the green, so be careful with your approach.
Expected Score: 3 Hole 2 - 405 ft - Par 4
The tunnel is shorter this time, but still tough. play the shorter version just like the longer version — with a series of low midrange shots designed to stay in the fairway and remove the dense trees from the shot.
Expected Score: 4 Hole 3 - 149 ft - Par 3
Challenge the OB creek that is just a few feet behind the pin. Coming up short is just foolish — and embarrassing. Try a backhand “force-over” with a stable midrange — this may give you a better chance at a birdie. “Aggressive” is OK on this hole.
Expected Score: 2Hole 4 - 337 ft - Par 4
The notes on this hole will depend on which tee and which basket are used. If the traditional short layout is used, then the drive is the same as with the long layout — try to stay on the right side of the fairway and don’t pinch off your approach. If you play the drive correctly, a birdie is definitely in play.
Expected Score: 3Hole 5 - 225 ft - Par 3
The distance is deceptive here, as the fairway is a blind, drastic uphill dogleg right. Make sure that your shot has enough turn, but less height than you normally use. Don’t sweat this one. Par is good.
Expected Score: 3Hole 6 - 452 ft - Par 3
Keep your drive farther right than you think you need, the downhill slope will push your disc left. Birdie is not possible, so play smart and move on.
Expected Score: 3Hole 7 - 149 ft - Par 3
Like the long layout of this hole, this is a finesse shot — just don’t get greedy. You can pin this drive, but if you are not careful, you can easily go OB.
Expected Score: 2Hole 8 - 264 ft - Par 3
Your forehand drive needs to be perfect for you to have a look at a birdie on this one. It’s right at the limit of your range, but over-throwing can lead to mistakes in angle and height control. Unless your confidence is sky-high, it might be a better idea to play for position from the tee, and then have a stress-less up-and-down par.
Expected Score: 3Hole 9 - 272 ft - Par 3
This is a fairway where your OS Anvil really shines. Throw your normal forced-flex to the corner, then approach and putt for a par. Nothing fancy here.
Expected Score: 3Hole 10 - 275 ft - Par 3
Be precise with the backhand turnover drive from this tee pad — you have a tendency to scatter this tee shot because you are trying for too much distance. Be smooth and controlled, and a par should be a pretty sure thing.
Expected Score: 3Hole 11 - 269 ft - Par 3
It would be nice to actually birdie this hole, but your drive always lands short. Step up the distance and see if you can’t score a bonus birdie here. The drive is a straightforward backhand with a substantial fade.
Expected Score: 3Hole 12 - 282 ft - Par 3
Repeat after me: Play. To. The. Right! You have lost more strokes on this hole hitting the false corner than any other reason! Just play for par. Please!
Expected Score: 3Hole 13 - 675 ft - Par 4
This hole should be nicknamed “Exhaustion!” It takes 2 full-pull drives to get a look at the green, then a very exacting approach to access the basket. You can par this one, but you need to be focused, not frustrated or irritated. Play smart.
Expected Score: 4Hole 14 - 382 ft - Par 3
This straight downhill fairway always tempts you to try to make the green, but the odds are against it. Just play an easy backhand fairway and try to keep from ending up in the left side trees. Then get your par. Again, nothing fancy, nothing aggressive, nothing foolish.
Expected Score: 3Hole 15 - 211 ft - Par 3
I’ll just leave the notes from the long layout section for this hole. Not the most difficult hole, but certainly one of the most frustrating — combining a tight initial gap, a steep upslope, and lots of ugly rough if you miss your shot. You are NOT reaching this green from the tee pad (without a perfect shot at full power!), so disc down and play smart. A par on this hole is a win!
Expected Score: 3Hole 16 - 302 ft - Par 3
The second hole in a row which just seems to frustrate you every time you play it. Your drive won’t make the green, so play to stay on the left side of the fairway (NOT in the rough), and perhaps you’ll have a lane to get through the final trees to the green. Getting too aggressive has cost you strokes in the past, so try the “smart” play this time.
Expected Score: 3Hole 17 - 344 ft - Par 4
This is a pretty soft par 4, so ramp up the aggressive play and see if you can’t score here. A flex forehand is an option, which should put you on the right side of the sloping fairway and give you a better angle to the green. Just be careful of the early left side trees.
Expected Score: 3Hole 18 - 375 ft - Par 3
You are NOT getting to the green. You are NOT getting a birdie. So play away from the left side trees and give yourself a shot at the green from the right. This hole is easy to screw up, so be careful and make your par.
Expected Score: 3
Expected score: -3 (55)
Avg. Historical Rating: 960
WOW! Wouldn’t that be nice!! Given that my target is +3, I have 6 strokes to play with, which is a nice buffer. The word of the day needs to be “smart.” No over-aggression, no petulant pouting, no “I-can-make-up-for-that-last-mistake”. Just smart, consistent, confident play. You play in a professional division — time to start acting like a professional.
So just keep the plan in mind, leave the frustration in the car, and play with confidence.
And joy. Always with joy.