Tournament Prep: Battle At The Hills
Wasn’t I just here?
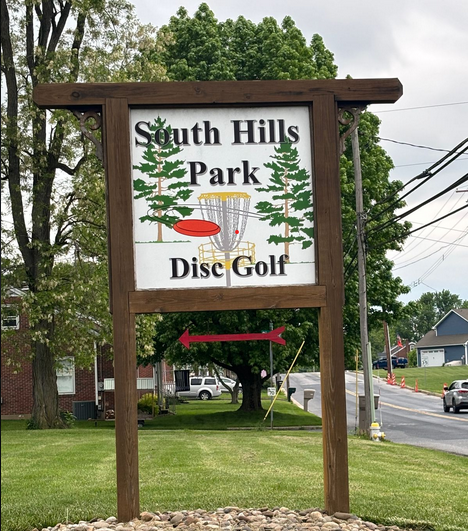
Two-and-a-half weeks ago, I was at South Hills Disc Golf Course in Lebanon, PA for the 2026 “Red Dead” tournament. In a few days, I’ll be right back there for the 2026 version of “Battle At The Hills.”
Same course — TOTALLY different tournament.
Where “Red Dead,” was mentally and physically challenging, with it’s added OBs, mandos, and extra holes, “Battle At The Hills” let’s the course speak for itself.
And sometimes, the words that it uses are NSFW.
The South Hills Disc Golf Course is a beautiful, well-maintained park-style course. Many of the fairways offer multiple lines to the greens, which are often well guarded. While there are a few “tunnel-like” fairways. most of the course is open. Its true challenge for me is the fact that there are not may scoring opportunities for someone with a sub-300’ arm. The shorter (Yellow) layout has an abundance of sub-300’ fairways, only 2 can be reached with a “less-than-perfect” shot. On the longer (Red) layout, there is only 1. Even if you include the “soft” par-4 9th and 15th holes, and the “soft” par-5 8th hole, the only hole that you can get by with an “average” shot is hole 4.
That is the beauty of South Hills. There always seems to be that one tree that is in the way, or the blind approach to the pin that isn’t quite where you think it is, or that pile of rocks that forces you to adjust your line, or that bush that makes you adjust your stance. It doesn’t seem like much — but it always seems to me there.
So let’s see if a little preparation can reveal some extra edge that I can use to my advantage.
Course Stats
Here are the distance stats from UDisc for each hole:

Course Data
My current course data is drawn from 9 years of tournament data from the PDGA website. It averages the round ratings across all of the sanctioned tournaments in that timeframe and for this layout, and dumps out statistics for the course. This is what it looks like:
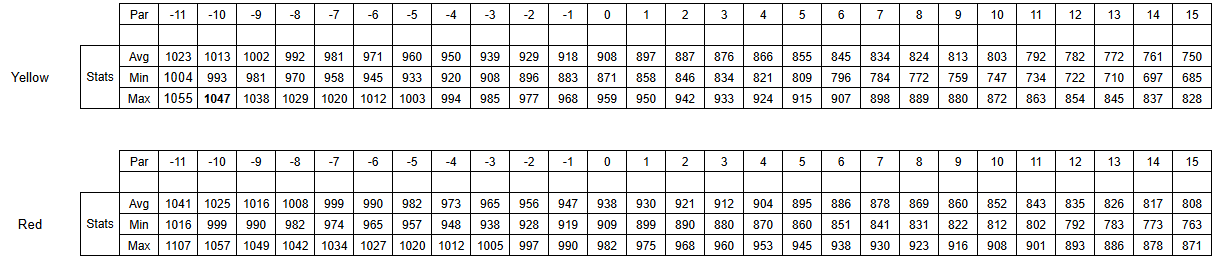
Given that I would like to consistently hit a 930+ rating on my rounds, it looks like I would need to throw a 2-under on the yellow layout and a 1-over round on the red layout to hit that mark for the day
So this is my goal -- 2 under on yellow and 1 over on red.
My Data
As of today, my personal data for the South Hills “Yellow” consists of only 2 recorded, rated rounds where I have accurate statistics for each hole. This is the summary data:

My data for the red layout consists of more rounds (8), so the data may (or may not) be a little more accurate:

Explaination:
Current Average My average for that hole across all of my recorded rounds
Optimistic The above average rounded down
Pessimistic The above average rounded up
Rounded The above average rounded numerically (.5 rounds up)
Reasonable My best guess at what I *should* score on this hole
Current Target What I would *like* to score on this hole (usually, but not always, the same as the "Reasonable" score above.)
Tumbling Down the Rabbit Hole
I look at each hole individually and gauge my score probability based on hole distance and elevation change, and my score on that hole from my previous rounds. I have played a few rounds on this course, so I'll also factor in what I know about how I throw the hole.
Hole 1
Red: 420 ft - Par 3
Yellow: 340ft - Par 3
Long downhill forehand. The walking path of the left side of the fairway is OB, so don’t over-turn your drive. The drive for the yellow layout should hold straight longer than the drive for the red pin. Keep the “red” drive extra high so that it moves farther to the right and opens up the approach. This should be an easy par for the yellow layout, but history and distance suggests a 4-spot for the longer layout.
Target Score: Red: 4, Yellow: 3Hole 2
Red: 325 ft - Par 3
Yellow: 270ft - Par 3
Play this hole as normal, making sure to clear the OB walking path. For the yellow layout, don’t drift too far left, as it will cut off your approach. Drifting left during the red round is good, but don’t go too far or you will be stuck behind brush. Play the same drive for both, but use a more stable disc for the red layout.
Target Score: Red: 3, Yellow: 3Hole 3
Red: 425 ft - Par 4
Yellow: 340 ft - Par 3
The drives for both rounds will be the same; play down the right side and stay straight for as long as possible. That should give you a simple approach to the yellow pin and open up the second shot to the red pin. The red basket is farther down the tunnel than you remember, so don’t short your second shot. a birdie is definitely possible on red par 4 layout, but don’t play a foolish shot if you don’t have the lane. You’re playing smart, remember?!
Target Score: Red: 4, Yellow: 3Hole 4
Red: 278 ft - Par 3
Yellow: 267 ft - Par 3
The drive here is almost exactly the same distance, except that the red layout needs a left-finishing forehand and the yellow layout needs a right-finishing backhand. Make sure that you clear the first trees!! This is the only pin that has a reasonable probability of a birdie, so don’t waste it.
Target Score: Red: 2, Yellow: 2Hole 5
Red: 290 ft - Par 3
Yellow: 240 ft - Par 3
Flex your backhand drive on the red layout for some extra distance and to move to the right, where the approach to the pin is a little more open and forgiving. “Straight and long” is a good choice for the backhand drive to the yellow pin, as the left finish should drop you into a good landing zone for an easy up-and-down.
Target Score: Red: 3, Yellow: 3Hole 6
Red: 350 ft - Par 3
Yellow: 267 ft - Par 3
After playing “Red Dead” with the nasty OB on both sides of the fairway, this hole should seem to play MUCH easier. Keep the drive to the right to avoid the brush on the left edge of the fairway. The drive for both rounds should have the same target, but the yellow round will need a fairway driver while the red round will need a full distance driver.
Target Score: Red: 3, Yellow: 3Hole 7
Red: 325 ft - Par 3
Yellow: 270 ft - Par 3
The drive for the red pin should stay farther right than the drive for the yellow pin. A perfect drive during the yellow round may result in a birdie look, and keeping the drive wide right during the longer round will open up the approach and (hopefully) minimize the chances for a bogey.
Target Score: Red: 3, Yellow: 3Hole 8
Red: 617 ft - Par 5
Yellow: 415 ft - Par 4
The smart drive for both rounds is a distance forehand down the left side of the fairway that stays straight as long as possible. This should give a good look at a birdie approach to the yellow basket and multiple options for the second shot at the red pin. The red basket is deeper in the garden than it seems, and surrounded by “grabby” branches, so pick your line carefully.
Target Score: Red: 5, Yellow: 3Hole 9
Red: 365 ft - Par 4
Yellow: 240 ft - Par 3
Play to the right side of the rock pile on both drives. Play the yellow drive long enough, and you’ll have a look at a birdie; play the red drive even further and have a wide open look at your approach. This one always seems to be a problem. Time to play the smart shots and stop dropping strokes here.
Target Score: Red: 3, Yellow: 2Hole 10
Red: 320 ft - Par 3
Yellow: 315 ft - Par 3
Your forehand drive at “Red Dead” landed too far right. Don’t be afraid to give your flex forehand drive a little extra “flex” on this fairway. DO NOT use the Adder for the drive during the red round, it fades too fast and you never make the green. Stick with the Prince for red — and use the Sword for yellow, as it will hold the flex longer and (hopefully) put you in the center of the fairway for your approach.
Target Score: Red: 3, Yellow: 3Hole 11
Red: 420 ft - Par 3
Yellow: 325 ft - Par 3
Use whatever drive is getting you the most distance. If the backhand is the choice, play the drive a little farther right than usual, as this fairway seems to skip more than others, and you’ve had trouble with the left-side OB path in the past. This is a solid 3 par for both rounds; just don’t do anything silly.
Target Score: Red: 3, Yellow: 3Hole 12
Red: 400 ft - Par 3
Yellow: 300 ft - Par 3
Just play safe. The OB path left is close to the fairway, and ridiculously easy to cross. Play an easy backhand driver both rounds, then clean up whatever is left. You’re not going to score on this hole — just don’t add strokes.
Target Score: Red: 3, Yellow: 3Hole 13
Red: 770 ft - Par 5
Yellow: 613 ft - Par 4
Here is another hole where you are NOT going to score, but you can certainly lose strokes if you are not careful. You first two drives during both rounds are maximum distance drives. Don’t forget about the OB path on the left — usually not an issue. If you have an open look at the green during the red round, play the shot to go long. You are always short of this green, so playing long may result in a nice change.
Target Score: Red: 5, Yellow: 4Hole 14
Red: 280 ft - Par 3
Yellow: 255 ft - Par 3
This is a tough hole. You’re always going to be tempted to try to make the yellow green, so if you are feeling frisky, go for it. But the better play is a midrange to get most of the way there, then another midrange onto the green and walk away with a par. The same goes for the red round; “midrange, midrange, putt” shouldn’t cause any issues, and it pretty much insures a par.
Target Score: Red: 3, Yellow: 3Hole 15
Red: 410 ft - Par 4
Yellow: 315 ft - Par 3
Don’t “short” this drive. There is a tendency to worry too much about the right-side OB, just straight-line your backhand driver down the middle. You may even have a good angle for your approach to the red basket — and possibly grab a bonus birdie — if the distance is long enough. You’re not going to score on the yellow basket, so don’t sweat it.
Target Score: Red: 4, Yellow: 3Hole 16
Red: 405 ft - Par 3
Yellow: 265 ft - Par 3
Watch the ground play here. A bad skip will put you in the tree line and make your approach difficult. You have never scored on this hole - even though the short pin in within your range. Just grab 2 more pars here and be happy.
Target Score: Red: 3, Yellow: 3Hole 17
Red: 440 ft - Par 3
Yellow: 335 ft - Par 3
Crank! Your! Drive! (Was that emphatic enough!?) Your mistake here in the past has been to short your drive and make your second shot harder than it needs to be. Think through your second shot on the long layout — you’re probably going to need to go longer than you think. Remember that your approaches are based on accuracy, so don’t be nonchalant with your approach to the yellow basket.
Target Score: Red: 3, Yellow: 3Hole 18
Red: 390 ft - Par 3
Yellow: 300 ft - Par 3
The Hill. Just get to the crest. Don’t over-throw, which has cost you strokes in the past. Your approach to the red basket has been historically short, so keep that in mind. This should be another “pair-o-pars.”
Target Score: Red: 3, Yellow: 3Hole 19
Red: 625 ft - Par 4
Yellow: 625 ft - Par 4
Temp Hole #1 — This one is a bit different from what I remember, but as long as you can keep yourself away from the pickleball courts, you should be able to avoid losing strokes here. Remember the baskets on the temp holes have been a bit… er… “iffy” in the past, so try to get your approach as close as possible.
Target Score: Red: 4, Yellow: 4Hole 20
Red: 350 ft - Par 3
Yellow: 350 ft - Par 3
Temp Hole #2 — The addition of the early double-mando makes this fairway a real question. Without being able to see the distances and angles, my thought is that you should lay-up before the mando line, then go for the island on the second shot. This is going to be a tricky hole, and I think that it is going to generate some big numbers for people. Just try not to be one of those people.
Target Score: Red: 3, Yellow: 3Hole 21
Red: 450 ft - Par 4
Yellow: 450 ft - Par 4
This hole was in the “Red Dead” tournament, and I birdied it. Now you have 2 more chances. Stay to the right and remember that there isn’t much room behind the basket.
Target Score: Red: 3, Yellow: 3
Target scores:
Red: -2 (70)
Yellow: -3 (64)
Avg. Historical Ratings:
Red: 956
Yellow: 939
This is going to be a tough weekend to try to hit my target of 930 for either round — last year a 930-rated round was an Even (69) on the red layout and a -3 (64) on the yellow layout. And the Red layout is one stroke harder/longer this year.
But hey, this is why we head out as often as possible to throw ourselves at this sport — because you never know what could happen!