Tournament Prep: The Coleman Challenge
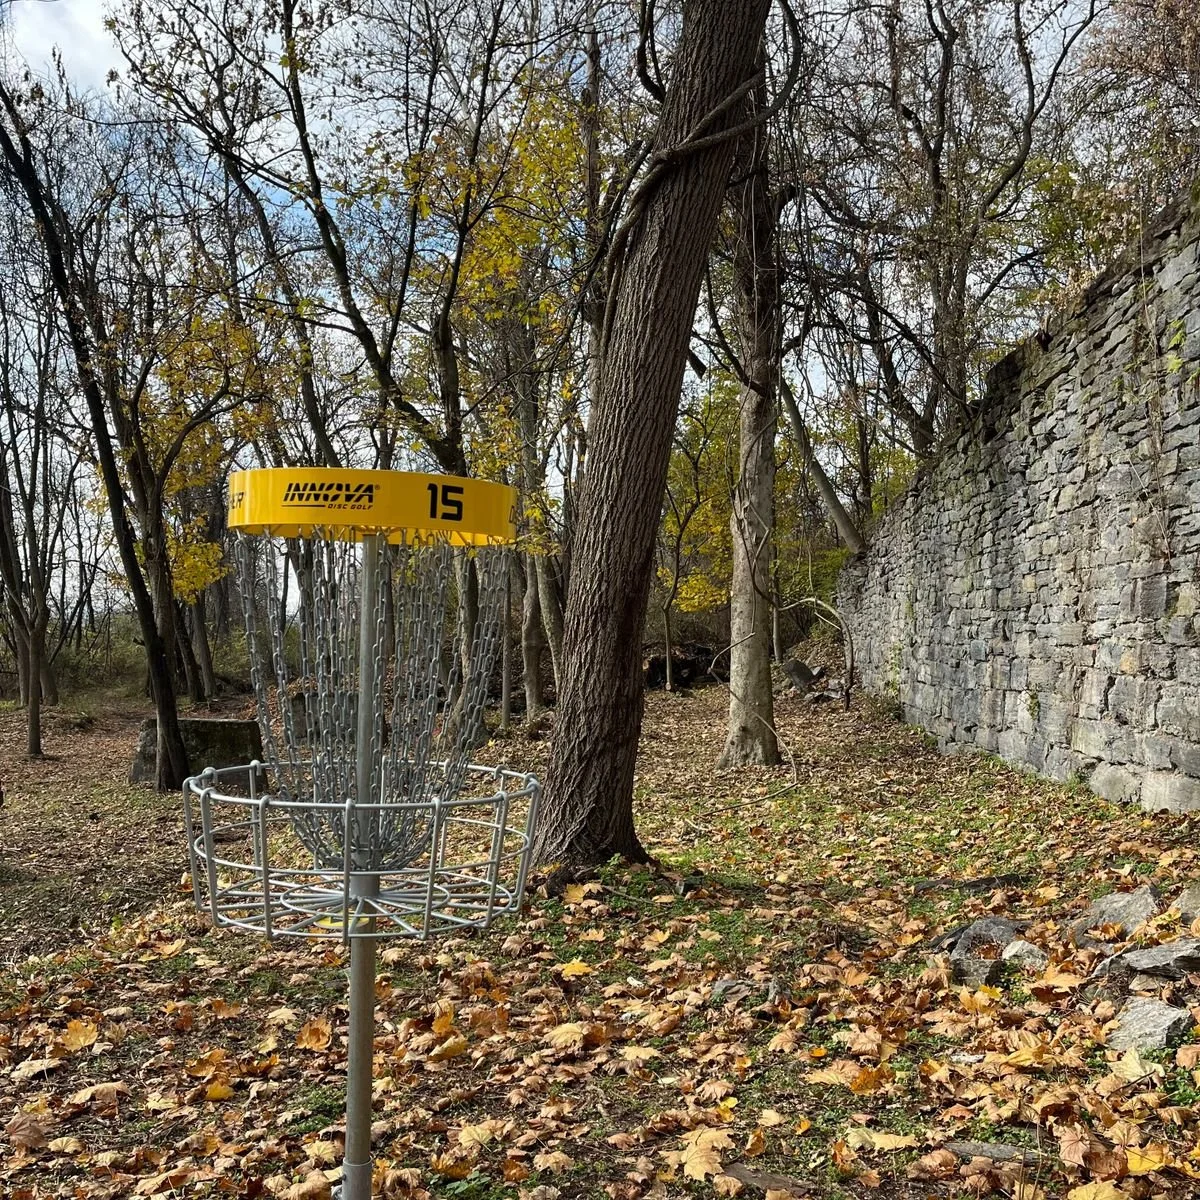
After the fiasco that was the Lake Marshall Open, it’s back to a local course for the Coleman Challenge, held at Coleman Memorial Park in Lebanon, PA. The course design at Coleman was created by the dynamic duo of Mike Dunkle and Charlie Greco, and once again they’ve worked their sinister magic to create a wooded masterpiece. Coming in at just over 9,000 feet for the Red (long) layout and just over 6,000 feet for the Yellow (short) layout, this course uses elevation changes, fairway pinch points, and small, guarded greens to entice and frustrate beginners and seasoned tournament competitors alike. Accuracy and intelligent play are both in demand; let either slip, and you’ll find yourself at the course’s mercy.
The tournament consists of 1 round on each layout. I’ve profiled this course in a “Course Playthrough” earlier this year, focusing on the Yellow layout, which is the shorter of the two main layouts; however, I have played most of my rounds here on the longer Red layout. That being said, I’m familiar enough with both layouts that I should be able to come up with a strategy to score well.
As long as I don’t have a disastrous weekend like the last one.
Course Stats
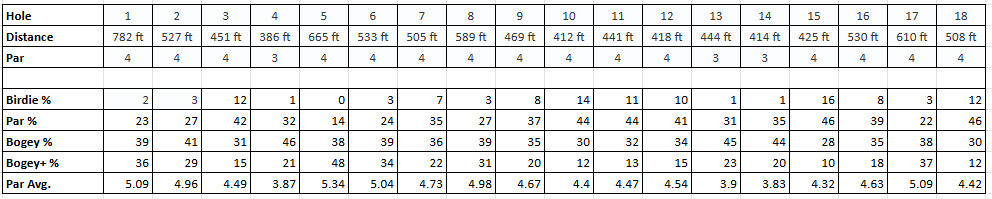
Here are the stats from UDisc for each hole:

Yellow Stats
Red Stats
Note: I’ve added UDisc’s score percentages and used then to calculate my own score average for each hole.
Course Data
Since this course has only been around for a few years, there is a limited amount of data available for analysis. These tables average the round ratings across all of the sanctioned tournaments in that timeframe and for these layouts, and dumps out statistics for the course. This is what it looks like:

Yellow Ratings

Red Ratings
Given that I would like to consistently hit a 930+ rating on my rounds, I would need to throw a 2-over on the Yellow course and 7-over on the Red course to hit that mark.
So those are my goals: +2 and +7.
My Data
As of today, my personal data for the Coleman Park courses consists of 15 recorded and rated rounds (2 on the Yellow layout and 13 on the Red layout). Here is the summary data:

Yellow Data

Red Data
Explaination:
Current Average My average for that hole across all of my recorded rounds
Optimistic The above average rounded down
Pessimistic The above average rounded up
Rounded The above average rounded numerically (.5 rounds up)
Reasonable My best guess at what I *should* score on this hole
Tumbling Down the Rabbit Hole
I look at each hole individually and gauge my score probability based on hole distance and elevation change, and my score on that hole from my previous rounds. I have played more than a few rounds on these courses, so I'll also factor in what I know about how I throw each hole.
First, I’ll work through the Yellow layout.
Hole 1 - 350 ft - Par 3
We start with a fairly open (as far as this course is concerned), downhill drive to a basket set on a slight rise. A tree-lined OB road to the left and a drainage ditch on the right define the fairway, with trees dotting the edges (and a few in the middle, of course!) The trees are a little closer to the desired flight path on the left, so the smart option is a backhand drive (with a distance or fairway driver, depending on how spicy you feel) down the right side of the fairway with a reasonable fade back to the middle. The basket is on a mound, so a missed putt will likely roll away, but as opening holes go, this one is pretty straighforward.
Expected Score: 3 Hole 2 - 376 ft - Par 4
Back up this hill, but this time with a much narrower fairway. the OB road is again on the left, and much closer to the fairway, so kicks are more likely to add penalty strokes on that side. The right side just has heavy rough to contend with. The fairway doglegs to the right at about the 300’ mark, but you don’t have 300+ feet of power in your forehand, so making the turn isn’t happening. Play a backhand driver low up the middle to avoid any lower branches and try to minimize the skip. This should leave you on the left side of the fairway with the best chance for a look past the dogleg corner to the basket. As long as you don’t hit early, you should be fine.
Expected Score: 3 Hole 3 - 320 ft - Par 3
Continuing up the hill, this fairway is similar to hole 2, except that it is substantially shorter and the pin is on the left side of the fairway instead of the right. There’s no benefit to doing anything fancy here, since 320’ is beyond your driving range. Just stay out of the garbage and give yourself a shot onto the green. The OB road on the left shouldn’t come into play.
Expected Score: 3Hole 4 - 314 ft - Par 3
Here is where the course starts to demand some thought and skill. A straight, narrow fairway opens to an area that slopes substantially left-to-right, with the pin set near the right rough. Too much left-to-right movement on your shot could cause you to fly/skip farther down the hill than you would like, and the rough is restrictive enough to easily add digits to your score. A backhand turnover drive is probably your safest bet — just make sure that your disc choice is over that takes into account the need to fade back away from the trees. Again, smart and conservative choices here are key — this isn’t the time or place to get aggressive.
Expected Score: 3Hole 5 - 500 ft - Par 4
This should be called “Coleman Park Signature Hole #1!” A long, narrow, and severely downhill fairway leads to an abrupt left turn at the bottom. Short your drive and you cut into the left side trees, forcing a scramble and pinching off your look at the tiny green; push too long, and the rough is dense enough to challenge your approach; accidentally go too far right, and you’re looking at at least one extra stroke. Just take a midrange or straight-flying fairway driver and lace the first part of the fairway, then see what you are left with. A perfect drive gives you access to the pin and a possible birdie — anything else and you’re working hard for a par or worse.
Expected Score: 4Hole 6 - 324 ft - Par 3
Uphill on a narrow fairway with punishing rough on each side. You’re not reaching this pin with your drive, but you should try to stay to the right side of the fairway to give yourself the best access with your approach. This is a tricky par 3, so play it safe.
Expected Score: 3Hole 7 - 375 ft - Par 3
Keep your backhand drive as wide to the right as you can, since the downhill slope of the fairway will let you get close enough for a look at the green — which is on the left side of the fairway. Like hole 5, a birdie is possible with a perfect drive, but don’t risk a big number going for that perfect drive if your confidence doesn’t warrant it.
Expected Score: 3Hole 8 - 420 ft - Par 4
Touchy, touchy! This fairway has a pinch point at the halfway point, and you need to be moving left when you hit it. A backhand drive that pushes forward at the end would be best. This is definitely a scorable hole, but only if you hit your drive correctly. Your second shot (after that perfect drive) will be a forehand to a guarded green on the right side of the fairway. The right-side rough is REALLY close to the pin, so watch your distance control on the approach.
Expected Score: 4Hole 9 - 287 ft - Par 3
Another fairway with a pinch pint at the halfway mark, but in this case the green is to the left, not the right. The pinch is tighter here, and a bad kick (especially to the left) will really hurt, so be precise. You probably aren’t going to be scoring here, so “safe” is a good play.
Expected Score: 3Hole 10 - 270 ft - Par 3
Pinch point #3 in a row, but this one is closer to the green than the others. You will want to be heading slightly left at the pinch, as the pin is to the left just beyond the trees that you can see from the teepad. Possible scoring opportunity — but, as usual, a sure par is better than a “possible birdie/probable bogey” gamble.
Expected Score: 3Hole 11 - 280 ft - Par 3
This is a big forehand drive (since the fairway doglegs to the right), but don’t cut too hard to the right at the end. A backhand turnover would be a better drive here, but yours isn’t consistent OR accurate enough to risk it. Just play the forehand drive, then work your approach to the pin, get the par, and move on.
Expected Score: 3Hole 12 - 232 ft - Par 3
There are 3 gaps on this short little par 3, and all of them are narrow. Your normal play is a forehand fairway drive down the left gap, which is the widest of the three. Don’t over-throw — it’s not as far as it looks, and too much power risks your accuracy. Use the Fortress for the bigger fade — and who knows, you may actually have a look at a birdie.
Expected Score: 2Hole 13 - 320 ft - Par 3
The temptation here is to try to get around the big tree which hides the pin… but you should resist that temptation and keep your drive to the left and up the hill. This left-to-right sloping fairway has “roll-away” written all over it, so play it safe here. This is an easy par 3, but it is also a hole where a mistake can balloon into a bigger number than you want.
Expected Score: 3Hole 14 - 315 ft - Par 3
The only danger here is over-throwing your drive. Just backhand your King down the center of the fairway and let it fade to the hanging basket. You don’t need the extra power — the downhill fairway will do the hard work for you. Be smart.
Expected Score: 3Hole 15 - 320 ft - Par 3
This is another hole where trying too hard will cost you much more than the the little extra distance that you may get will give you. A straight backhand drive past the initial tree line, then a pitch up to the basket perched on the wall will get you the par that you should have. Over-throwing the drive will gain you nothing but a headache and another spoonful of frustration.
Expected Score: 3Hole 16 - 323 ft - Par 3
This is another par 3 that is not a scorable hole for you. Remember that, and play the safe backhand drive to the other side of the ravine, then pitch around the guardian trees, get your par, and save your emotional state!
Expected Score: 3Hole 17 - 353 ft - Par 3
This is the worst “pinch-point” drive on the course. Keep in mind that, even though the fairway turns to the left after the pinch, the angle isn’t as tight as you think. Once again, don’t over-throw. Just get past the pinch, don’t go long (there’s OB all along the right side of the fairway), and give yourself an easy approach to the pin.
Expected Score: 3Hole 18 - 383 ft - Par 3
Use your flippy King to throw a long turnover from the tee here, and swing around the right side the the densest of the woods. It makes the hole longer, but you don’t risk having to pick you way through the trees. Your second shot will be a bit long for an approach, and you should play it a bit longer than it looks. You can par this one, but only if you’re smart.
Expected Score: 3
Expected score: -2 (55)
Avg. Historical Rating: 968
Since your goal is +2, you have some space for a mistake or two. Just don’t make it a habit!
Now for the Red course:
Hole 1 - 782 ft - Par 4
The first drive is just a “get as much distance as possible” shot, while staying away from the left side OB. The next shot (depending on where your initial drive lands) needs to approach the green from the right (uphill side), while keeping in mind that the park road closes in around the green on tha back side as well as the left. Normally, you are left with an approach of around 120’, so pick the midrange with the correct shot shape and get yourself close. This is a tough hole for you, so don’t let it get you into the wrong mindset.
Expected Score: 5 Hole 2 - 527 ft - Par 4
Uphill and narrow, but reasonably straight. Use control drivers to keep yourself between the rough (right) and the OB park road (left). Two good drives should get you an easy look at an up-and-down par.
Expected Score: 4 Hole 3 - 451 ft - Par 4
Still uphill, with a right dogleg turn near the green. Try to keep your initial drive on the left side of the fairway for an easier second shot. The green is VERY well protected, so think your approach through carefully.
Expected Score: 4Hole 4 - 386 ft - Par 3
The longer version of this hole takes the dangerous left-to-right sloping fairway out of play by putting the pin to the left, allowing for a backhand shot that will land into the slope instead of skipping down it. Getting past the subtle dogleg in the fairway gives you an open look at the pin, as long as you avoid drifting too far into the rough (left OR right).
Expected Score: 3Hole 5 - 665 ft - Par 5
Break this one down into discrete pieces. Step 1 - get down the hill and onto the bottom fairway. Step 2 - use the entire width of the bottom fairway to avoid the rough and move toward the green. Step 3 - stay left with your third shot to give yourself a better angle at the pin. Step 4 - keep your approach relatively low to avoid kicking out of putting range. Step 5 - be happy with your par and move on; this isn’t the place to try to score.
Expected Score: 5Hole 6 - 533 ft - Par 4
The initial drive sets up his entire hole. Get past the pinch point with your initial drive and have your drive finish right to better your angle. Your second shot should probably challenge the right side of the fairway to avoid getting pinched left with no shot at the pin. This is a small green, so be careful with your approach.
Expected Score: 4Hole 7 - 505 ft - Par 4
A backhand drive through the smaller right gap is the preferred shot. This will set up the approach shot down the tunnel to the green. There is OB left and behind the green, and it is close, so your approach needs to be precise.
Expected Score: 4Hole 8 - 589 ft - Par 4
Making the pinch point on the initial drive is the hardest part of this hole. Get your backhand shot through this gap, and the rest of the shots should be relatively easy.
Expected Score: 4Hole 9 - 469 ft - Par 4
Another initial drive with a pinch point obstacle; your backhand should work well on this one also. The trees are a bit more numerous at the end of this fairway then they have been previously, so your approach may need to be a bit more creative. There is rough and a drop off behind the pin, so try not to overshoot the pin.
Expected Score: 4Hole 10 - 412 ft - Par 4
Here is the third “straight fairway with a pinch point” hole in a row, although this one may work better with a forehand drive. The rough surrounding the pin is VERY dense, so be careful as you approach.
Expected Score: 4Hole 11 - 441 ft - Par 4
Use the same drive as in the previous round (high forehand), then see what you have left toward the long pin. Simplify your approach by staying as far right on the fairway as you can. The green is shallow with OB behind, so watch your distance control.
Expected Score: 4Hole 12 - 418 ft - Par 4
If you’re feeling extra-spicy, you can try a big turnover backhand drive off the tee; otherwise, use a forehand and the leftmost gap to get to the short pin, then pick your way to the green. There are some bushes guarding the pin right and deep, so be careful how you approach.
Expected Score: 4Hole 13 - 444 ft - Par 3
Stop trying the move your shot right and down the hill from the tee pad — that never works and it makes a mess of the rest of the hole. Use a backhand drive off the tee, then approach from the side as much as possible. The elevated, hanging basket looks cool, but it’s tough if you aren’t close.
Expected Score: 3Hole 14 - 414 ft - Par 3
Try to keep your initial downhill drive as straight as possible for as long as possible. This should put you in a more open area for your approach. This is probably the easiest hole (for you) on the course, so take advantage,
Expected Score: 3Hole 15 - 425 ft - Par 4
Straight off the tee pad, then straight again to the green. Nothing fancy, and the less complication on this hole, the better, since the elevated pin on top of the raised foundation adds enough challenge all by itself. You don’t need to get fancy or far, but you do need to be accurate.
Expected Score: 4Hole 16 - 530 ft - Par 4
If you can manage to get your initial drive to move to the right after clearing the ravine, do so, as it makes an approach possible on your second shot. Otherwise, you will probably need to throw a short pitch just to get into position to approach the basket. The OB right is a severe downslope that is heavily wooded, so be warned and stay away.
Expected Score: 4Hole 17 - 610 ft - Par 4
I am convinced that this is a mislabeled par-5 hole, with it’s early pinch point, left-to-right sloped fairway, and heavily wooded approaches. Making the initial gap goes a long way towards scoring on this hole — then pick your way to the green. A “5” here isn’t a bad score — this is probably the hardest hole on the course.
Expected Score: 5Hole 18 - 508 ft - Par 4
See if you can manage to beat the tree line and get up onto the plateau on your initial drive; this will make the rest of the hole MUCH easier. Once there, long approach to a fairly open green will put you in position for a look at a rare birdie.
Expected Score: 4
Expected score: +2 (71)
Avg. Historical Rating: 963
I’ve played 11 rounds on the Red course, and while my bes score wasn an Even par (69), my average is just south of a +4 (73). Since the expected score is in between the two, hitting the target is well within reach, as long as I have a good round. Confidence is key.
So just keep the plan in mind, leave the frustration in the car, and play with confidence.
And joy. Always with joy.